Tomorrow we're off to New York for the music hackathon! I'm really excited to see what others will create or have already created. Plus, it's always nice to visit New York City every once in a while. We'll be staying in Brooklyn for the weekend and traveling into Manhattan for the Hacking events. Fun stuff!
So, today I've almost completely finished the video to accompany the MaKey MaKey Chord Board. It's been quite an evolution from the concept to the prototyping to where it is now! We recorded some short bits of footage today which presented alternative uses for the MMCB. Graham demonstrated the MMCB's usefulness as a musical accompaniment tool and I demonstrated how the MMCB can branch out as a D.I.Y. sampling instrument!
All that's left is some editing and rendering and then we'll have a nice little set of videos to go along with our project for the music hack day and also the MaKey MaKey contest. The contest submission due date is June 30th which is Sunday! Man, that creeped up on us quicker than expected (even though the original due date was about two weeks earlier).
Just a quick disclaimer: My short sampling clip is goofy! But, that's how it goes sometimes!
Now to head home and get packin' for the hackin'!
Thursday, June 27, 2013

Wednesday, June 26, 2013
Wednesday: Backtracking...
Apart from being low on sleep, today was set out to be a normal Wednesday. Then I opened, or tried to open up the Final Cut project for our instructional video and...nothing. Seems that Final Cut was on the fritz yet again. So, i had to reinstall the program and, unfortunately, start all over from scratch. I was able to reconstruct about 90 percent of the video from the new install. So all that's left is to record a little more footage and then the video will finally be done! Just in time too, since the contest deadline is the 30th.
The reconstruction was quite tiring, i'm burnt out for the day.
The reconstruction was quite tiring, i'm burnt out for the day.
Monday, June 24, 2013
Monday: Ideas, Ideas and More Ideas!
One large problem with the MaKey Makey Chord Board was solved today, the annoying re-triggering of the inputs. This definitely made playing the MMCB more difficult than it should have been. If one held the button for too long, the chord would re-trigger many times per second, which was confusing and slowed down the experience of playing the Chord Board itself.


At first I had thought that the main problem lied within the MaKey MaKey's firmware, so I tried for about an hourd to add some sort of delay into the input state change section of the firmware. There was even a function called "add Delay" but it was of no use.

It is simple to just tack on a millisecond amount delay within the Arduino firmware, but after repeated failed attempts doing so, it was apparent that the problem lay not within the MaKey MaKey but within Scratch. Since Scratch is controlling the playback of the chords, it must interpret the input it receives from the MaKey MaKey and if so, then Scratch might be able to alter the timing of the triggered chords.
Enter Dr. Ruthmann, who always seems to find a nice, simple solution. The key consideration was that Scratch was not directly triggering the chord when the button on the MaKey MaKey was pressed, instead each button when received corresponded to a broadcast message, then another block of code received the broadcast and provided the if/then statements to play the chord either in root position or in first or second inversion. Here's the visual.

In this state, the broadcast is sent continuously when any button is held down. This is the annoying thing I mentioned above. So, how did we get rid of it? Dr. Ruthmann found an elegant solution using only three extra Scratch Blocks. The new command when a key is pressed reads like this, when x key is pressed, broadcast a message, BUT wait until the key is released to send the message. The new code looks like this, very simple.

Viola, that little addition quieted the re-triggering instantly. Now we just have to paste that into all the other blocks for the other instruments and everything will be all right.
Now, I mentioned Ideas in the title, there were so many ideas flying around today. Since the MMCB was in a good place as far as prototyping goes, Dr. Ruthmann and I brainstormed for a while about possible new directions for the musically oriented MaKey MaKey as well as possible ways to repurpose the MMCB into a musical kit with multiple projects.
Three new creatures came out of the brainstorm, the first was a simple piano layout design that would be familiar to people who have some keyboarding experience or who want to gain experience on the keyboard. This would be nice and easy to construct, wither using the tacks currently in use or maybe using strips of metal plated tape to form the piano keys.
The Second new device is really a new instrument, completely different that anything we'd though of making before. This project would be a chromatic-layout melodic instrument. Keeping the same heptagonal pattern as the MMCB, two conductive rings would be added the original pattern widened out a bit. Here's a little mock-up design I put together just now.

This is cool since the traditional piano layout is again replaced with a much more natural design. Also, the user has the option of hitting the plus and minus semitone buttons at with the tacks on the right side, or the same operation can be done by touching the inner and outer loops around the notes. This means that the user can play a note and pitch shift with one finger! Cool stuff and definitely a promising idea for the MaKey MaKey Music Kit.
The third idea floating around was for a drumkit setup for the MaKey MaKey. At first, this was slated to be the "simple" project, the one that was for the most part plug-and-play from the get-go. It then evolved into something much more in depth and educational. Now, the plan is to have some element of spatial sound representation in the drums themselves. I'd sample the drum kit, mic'ing the instruments with close and far microphone placement. THe samples will be processed into stereo files in order to provide a sense of space when triggered by the user. But, the design goes further. Using the far mic placement samples, we can create two kit sounds, one more direct and the other more ambient. While just plain cool in the first place, this also brings up possible educational applications in the area of critical listening. This could be a very neat way to help musicians, or anybody in learning how to perceive auditory spacial differences. I think this one will be a lot of fun to make and, even better, it gives me another reason to bash on the drum set at home!
That's a lot of stuff all rolled into one day! Now i'm off to the gym and before I know it, Friday will be upon us we'll be off to New York for Music Hack Day!
Thursday, June 20, 2013
Thursday: The Little Fixin's
Today wasn't so much about making the next big step in the Chord Board evolutionary track. Today, at least for me, was about tying up some of the loose ends of the documentation and some troubleshooting of the MMCB itself.
On the side of tying up loose ends, we had to replace a few scenes of B roll for the MMCB promotional video. I cleaned up the interview footage we took and pieced it together into a nice little sequence. We took new footage of the MaKey MaKey Chord Board in use. Then it was on to color grading and editing, which I find really amazingly powerful. Color grading can do some amazing things to make your film look accurate or as stylized as you could possibly imagine.
As for the troubleshooting side of things, we move to the MaKey MaKey and its integration with the Arduino editor software. A problem we've encountered for a while is the very fast re-trigger time on the buttons (inputs) of the MaKey MaKey. If we don't lift our fingers up quickly from the scale degree or inversion buttons, they will begin triggering their functions in a very rapid loop. This had become tiresome to deal with, so I set out to "de-bounce" the hardware inputs on the MaKey MaKey.
De-Bounce? Yeah, that's the term for basically setting a small delay between sensor input and performing the assigned task. Basically, the inputs sense our fingers very rapidly when the circuit is completed. Now, the MaKey MaKey senses "on" and "off" by way of voltage. Completing the circuit with a finger brings full voltage to the wire and the input on the MaKey MaKey, full voltage equals "on". When we release a finger from the button, the voltage drops down to zero, this equals "off" in the MaKey MaKey's logic. This isn't all of the story though. When a button is pressed, the voltage doesn't go all the way up instantly. In fact, the voltage "bounces" up and down from zero to full a couple of times before settling to a specific value. In order to stop confusing the MaKey MaKey, we have to write a "de-bounce" function. This will instantiate a small time delay between the pressing of a button and the carrying out of the action associated with the button. This delay only has to be a few milliseconds, enough to let the voltage settle down, but also quick enough that we don't notice a tactile delay when using the MMCB.
I'll be taking home the Makey MaKey Chord Board tonight so that I can work with the arduino code to implement this function into the firmware of the MaKey MaKey. Fun times ahead! I'm starting to bridge the gap between programming language and the physical application, i guess i'm realizing that computer language should be though of in the sense of real world functions. That's making it a bit easier for me understand, at least.
Tomorrow's Friday once again so, happy Friday in advance!
Have a good night.
Wednesday, June 19, 2013
Wednesday: Travel, Who Knew?
Exciting things to come, Dr. Ruthmann has told us about an exciting opportunity to get involved with music technology in New York. I'm really interested to see ideas generated by others that repurpose existing technology for a musical application. It seems that there will also be some sort of contest during the two days for the best "musical hack". Plus, this will be a nice opportunity to get out of the Bay state for a little bit.
Today's activities included a little bit of troubleshooting with the MaKey MaKey Chord Board 2.0. There was a considerable delay from the instance of pressing the button and triggering the chord on the computer. We switched back to the old plain nickel tacks and sure enough, the chord playback was back to the normal level. This brought to light another issue, the actual connection from the pin to the lead wires inside the box. At the moment the bare wire is just wrapped around the tack on the inside of the box. This is functional but no so reliable as time has revealed. So, a possible solution would be soldering the wire to the pins, but the solder would effectively lock the tacks into place. So Graham had the idea of using the conductive paint as a means of solidifying the connection.
So, with all that in mind, the MaKey MaKey Chord Board continues to evolve into a simpler, more intuitive and more durable project. Crazy to think that we still have about two weeks to refine our design, so the possibilities are wide open for the next iteration of the MMCB. Personally, it'd like to see a version made with a plastic project box using soldered connections. The project box could be a lot smaller than the MaKey MaKey box, maybe in the ball park of an iPhone for area, but with more depth. Anyhow, just an idea.
That's all for today, more video work tomorrow!
Today's activities included a little bit of troubleshooting with the MaKey MaKey Chord Board 2.0. There was a considerable delay from the instance of pressing the button and triggering the chord on the computer. We switched back to the old plain nickel tacks and sure enough, the chord playback was back to the normal level. This brought to light another issue, the actual connection from the pin to the lead wires inside the box. At the moment the bare wire is just wrapped around the tack on the inside of the box. This is functional but no so reliable as time has revealed. So, a possible solution would be soldering the wire to the pins, but the solder would effectively lock the tacks into place. So Graham had the idea of using the conductive paint as a means of solidifying the connection.
So, with all that in mind, the MaKey MaKey Chord Board continues to evolve into a simpler, more intuitive and more durable project. Crazy to think that we still have about two weeks to refine our design, so the possibilities are wide open for the next iteration of the MMCB. Personally, it'd like to see a version made with a plastic project box using soldered connections. The project box could be a lot smaller than the MaKey MaKey box, maybe in the ball park of an iPhone for area, but with more depth. Anyhow, just an idea.
That's all for today, more video work tomorrow!
Tuesday, June 18, 2013
Tuesday: Slow and Rainey
It feels like time is going slower today, and on top of that it is raining like crazy. So, not the best day morale but nonetheless a day to chip away some more at the MaKey MaKey instructional video. So with that In mind I decided to record my own portion of the tutorial video on the software downloads necessary for complete operation of the MaKey MaKey Chord board.


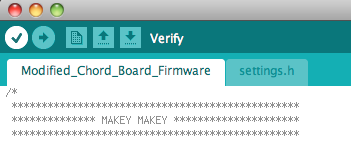

Nothing too fancy, just a screen recording which displays the steps necessary for making our Chord Board operational with the Scratch Code.
Step 1: Download the Arduino Editor from http://www.arduino.cc/en/Main/Software

Step Two: Download our modified firmware and settings files from DropBox to use in the arduino editor.

Step Three: Double click the Modified_Chord_Board_Firmware.ino file to open it along with the settings file in the arduino editor.

Step Four: With the MaKey MaKey connected via USB, click the "Verify" button on the top left of the Arduino Editor window.

Step Five: Once verification is complete, press the Upload button directly to the right of the Verify button. Once uploading is complete, the MMCB will be ready to use with the scratch program!

And that's how it's done, simple really!
Monday, June 17, 2013
Monday: Version 2.0
Let it be known that on this Monday June 16th of 2013, the second iteration of the MaKey MaKey Chord Board came to life! The process of construction and assembly went exponentially faster than with the first prototype. Also we used the fancier, steam-punkier brass tacks instead of the plain nickel plated tacks. Furthermore, the look and feel of the Chord Board was changed quite drastically. I'm very pleased with the new layout on the faceplate! We went from this...


To this!

This new faceplate design is far superior to the original linear pattern for a few reasons. First, there is no more "play" button on top of the box, instead we have attached an aluminum foil strip to three sides of the MaKey MaKey box (excluding the side which opens). Now, simply holding the box connects the user's hands to the ground, eliminating the need for the play button. Now chords can be played by pressing just one button!
The second leap forward in design was the placement of the buttons. The old linear succession of buttons made sense in relation to a piano keyboard, but it was not very ergonomic, at least not in my opinion. This new heptagonal shape (yes, it's a heptagon, just not a regular one) feels much better to play and frankly reminds me of a video game controller. That's cool for two reasons. First, the board is now ten times easier to play. Second, most kids and even adults have a good deal of familiarity with the layout of a common video game controller, so there will likely be less of a learning curve with the new design.
Another small improvement made to the device was flipping around the inside of the box itself. We had to change around a few of the connections, but more importantly this means that the USB connection is now placed in the back of the board. This got the cable out of the way from the user's hands and made for smoother operation. Also, we placed the USB connection point inside the box, instead of being flush with the outside of the MaKey MaKey box. The hole is just small enough to effectively lock the end of the USB cable inside the box for a much more reliable connection. The box must be opened to access the connection, but now the only visible connection is the other end of the USB cable into the computer, much cleaner and more reliable!
After the construction, all that was left to do was to tweak the code in Scratch in order to correspond with the new location of the buttons. Once that was sorted, the MaKey MaKey Chord Board 2.0 was officially functional! This is the evolution of technology, folks. I'm starting to wonder how many revamps the MMCB will undergo before we submit to the MaKey MaKey contest. We still have another week plus a few days, so more changes might be immanent!
Tomorrow is looking like a Video editing day, so we'll see what happens!
Good Night.
Subscribe to:
Posts (Atom)